Monday, December 9, 2013

Holiday Crafts for Toddlers

It's been far too long since I have posted here. This past January I started an art program at my local non-profit coffee shop. This coffee shop is quite unique because it caters to families with children and has a volunteer barista program to teach teens and young adults cafe skills. I generally prepare six art projects a month for a regular group of 15 to 30 kids with an average age of 2-3 years old! Lots of fun but also challenging because they are so young.

So here's what I am doing this December.

 
1) Edible Christmas trees made out of upside down sugar ice cream cones, icing, assorted candies, tiny marshmallows, and sprinkles. This is fun for kids of all ages! The littlest children may need help getting the icing onto the cone. Afterwards, they'll have no trouble decorating that tree. I separate the candy into snack baggies so that each child has their own (more sanitary too). I put the icing and cone onto a plate, give them a spoon and a bag of candy, and let them go. Sprinkles and marshmallows are usually passed out separately.


2) Cottonball snowman cards are so easy to make. Even very little children can make these if you put some prep time in. The red card is a piece of cardstock folded in half. On top of that is a snowman template cut out and glued onto the cardstock. I use white cardstock for the snowman. Two snowman fit onto one page of cardstock so you can give each child one snowman and let them cut it out or you can precut some for children who cannot yet manage scissors. Children can color the hats and then glue cottonballs on the snowman. Finish up with noses, googly eyes, little pompoms, ribbons, glitter glue, or whatever you have on hand. Here's a template:

Original art idea found here: http://www.craftscope.com/snowman/ 
 
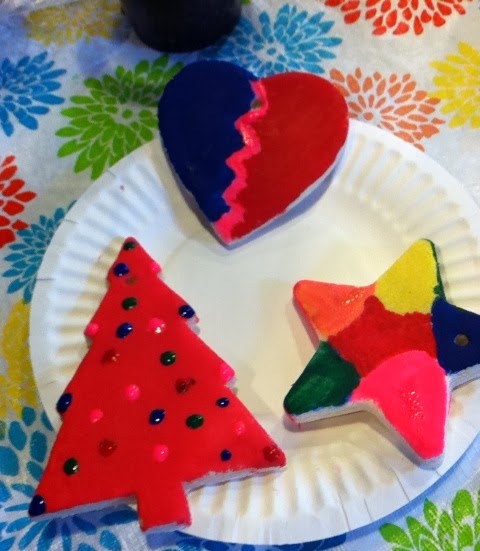
3) Salt dough ornaments. An inexpensive craft but somewhat labor intensive if you need to make a lot of them. These can be made way ahead of time though. Here's the recipe I used: http://www.busybeekidscrafts.com/Salt-Dough-Recipe.html. I dried these in the oven watching carefully and at very low heat. If the heat is too high, they will puff up too much. Use a straw or a chopstick to poke a hole in the top for a ribbon. Let dry thoroughly before painting. Here's a step-by-step tutorial: http://theimaginationtree.com/2011/12/easy-salt-dough-ornaments.html.


4) Reindeer craft. It wouldn't be Christmas without a reindeer craft. This year I am planning on having the kids make double candy cane reindeers like this:

 
I will use a glue gun to glue the candy canes together ahead of time. Kids will be given a choice of pipe cleaners, pom poms, and googly eyes so they can make their own reindeer creations. Yes, I will leave the plastic wrapper on the candy canes because I just know someone will get into them eventually.
 
5) Gingerbread men, women, or children. If you have an opportunity to read a gingerbread man (boy or baby) book, do so. The kids love it! I like both the Paul Galdone and Jan Brett versions depending on age and what you can find in your local library. This year I am going to use this template for a craft:

 
Because I am working with very young children, I will cut out the gingerbread men and let them do the decorating. I plan to offer different options; some sandpaper, some cardboard (cereal and cracker boxes). If I can find some cheap cinnamon sticks I will bring them for the kids to rub on the sandpaper. The decorating will be the fun part. There are so many options (puffy paint, oh my!), but I want to use up some supplies so I will offer some markers, buttons, feathers, sequins, googly eyes, bits of yarn and ribbon this time around.
 
And finally we reach #6...
 
6) Holiday hodge podge. This is just what it sounds like, a variety of holiday art projects! I'm not sure what I may decide to bring out; it depends what I am left with. This is also a great opportunity to put together some "take-away" projects as a little special holiday treat for the kids that come to the last art project of the year. They can make a project at the event and then take one home to make later. It's also fun to offer a final project that can be given away as a last minute holiday gift.
 
We made these snowflakes last year. I just used a glue gun to preassemble large colored craft sticks. Even the littlest kids really enjoyed decorating these with pom poms and sequins. A few leftovers may come out for the great holiday hodge podge of 2013.

 
 So that's this year's wrap up. Happy holidays to all.
 

Tuesday, February 28, 2012

And winter ends!

Spring has sprung around here. Some say it may be a false spring (silly groundhog, grumpy pessimists), but I think not! See evidence here:


So to wrap up our winter fun, I must talk about one of my very favorite winter theme days...our reindeer craft day/lesson. Reindeer are a fun way to celebrate Christmas/winter without getting too Christmas-y.

I like to start with some reindeer facts.
  1. Can reindeer swim? (yes)
  2. Do female reindeer have antlers? (yes)
  3. Do reindeer shed their antlers every year? (yes)
  4. Are reindeer herbivores or carnivores? (herbivores - plant eaters)
  5. What do reindeer eat? (grasses, mosses, lichen)
  6. What are the hard type of toes reindeer have called? (hooves - reindeer hooves spread apart as they walk to act like snowshoes)
  7. Are reindeer solitary animals or do they live in herds? (herds of 1000-10,000) 
  8. Where do reindeer live? (Northern parts of N. America - Alaska, Canada - N. China, Russia)
  9. Do reindeer live in tundra, marshes, deserts, or rain forests? (tundra - a treeless area near icecaps where the ground is always frozen)
After the reindeer facts, I ask for the names of all of Santa's reindeer: Dasher, Dancer, Prancer, Vixen, Comet, Cupid, Donner, and Blitzen. And don't forget Rudolph!

You can round out the fun with reindeer jokes, the reindeer hokey pokey, and a reindeer craft.
Reindeer Jokes
What do reindeer hang on their Christmas tree? - "Horn"-a-ments.
Why is Prancer always wet? - Because he's a "rain" deer.
How does Rudolph know when Christmas is coming? - He looks at his calen-"deer".

Reindeer Hokey Pokey
(Make antlers with your hands above head)
You put your antlers in, you put your antlers out
You put your antlers in, and you shake them all about
You do the Reindeer Pokey, and you turn yourself around
THAT'S WHAT IT'S ALL ABOUT!
(Right hoof, left hoof, fluffy tail, reindeer body)

Reindeer Paper Bag Puppet
The antlers are construction paper hands. Have the kids make one or two sets of hands...either will work just fine. The eyes are made of 2 small pieces of construction paper (one black oval and one white circle) with googly eyes on top. The nose is a black pom-pom although red works really well too! I folded the bag a little to give the face a bit more shape. A simple rectangular piece of green construction paper with some glitter glue on top makes a harness. My reindeer has a tag on his harness. His name is Ralph!


If you need an even simpler craft, make candy cane reindeer! For each child, you will need:

  • one candy cane
  • 1/2 of a pipe cleaner, brown or black
  • two small googly eyes
  • one small pom-pom
To assemble the reindeer, twist the 1/2 piece of pipe cleaner around the curve of the candy cane to make the antlers. Glue the eyes below the antlers and the pom-pom below the eyes for the nose. Voila! You've got a cute little reindeer to hang on the tree. 

Tuesday, January 31, 2012

Groundhog Day

Who's the most famous groundhog of all? Why, it's Punxsutawney Phil! He's been predicting the length of winter since 1887.


The story goes that if Phil comes out of his burrow on February 2nd and sees his shadow he will be frightened and run back into his burrow, predicting 6 more weeks of winter. If he doesn't see his shadow (because the sky is cloudy), spring will come early.

Groundhog's Day is always on February 2nd. February 2nd is the midpoint of winter, halfway between the winter solstice and the spring equinox.

Books
Punxsutawney Phyllis is one of my favorite Groundhog Day books. It's the story of Phyllis who thinks that she can predict an extended winter or early spring, but can she? In addition to writing a wonderful story, Susanna Hill has also provided us with lots of fun resources perfect for storytimes or classrooms. You will find the resources here, including classroom and library resources, coloring sheets, mad libs, and other activities.


Other great Groundhog Day books:
  • The Groundhog Day Book of Facts and Fun - Wendie Old
  • Go to Sleep, Groundhog! - Judy Cox
  • Groundhog Day! - Gail Gibbons
  • Gretchen Groundhog, It's Your Day! - Abby Levine

Groundhog Day Storytime/Craft Day

My groundhog craft day started off with groundhog questions such as:
  1. Has anyone ever seen a groundhog? (mostly found in Eastern U.S. states)
  2. What color are they? (brownish gray)
  3. How big are groundhogs? (about the size of a large cat, up to 15 lbs)
  4. Where do they live? (underground in burrows)
  5. Do groundhogs hibernate? What does hibernate mean? (yes, they sleep all winter long)
  6. What kind of food do groundhogs eat? (grasses, fruits and vegetables)
  7. What is another name for a groundhog? (woodchuck, whistlepig, marmot)
Then we did a groundhog madlibs found here.

Next we talked about signs of spring. Everyone had a chance to think up a sign of spring such as warmer temperatures, snow melting, birds singing, leaves budding, baby animals being born, flowers blooming, grass growing, etc.

Then we were supposed to read "Punxsutawney Phyllis" by Susanna Hill, but we ran short on time.

So we played a quick "burrowing" game with two hula hoops. To play, line up your kids in two lines (two teams) with each team of kids holding hands. The hula hoop has to be passed from one end of the line to the other without the kids letting go of hands. The kids will "burrow" through the hula hoop as it moves down the line. If you must have a winner for fun, say the first team to get everyone to "burrow" through the hula hoop wins.

Groundhog Craft

After the game, we did a groundhog craft. For this craft I used this groundhog picture found here.


I resized the groundhog on my computer so that I could fit 9 small groundhogs on one sheet of paper and then printed some groundhogs out on white cardstock.

Other needed supplies included:
  • cups (one each)
  • straws (one each)
  • green tissue paper 
  • small pieces of white and yellow construction paper (for the suns and clouds)
  • crayons or markers
  • glue
To assemble the craft, the kids glued tissue paper to the cup, colored and cut out their groundhog, attached the groundhog to a straw and pushed the straw through a small hole in the bottom of the cup. Then they had the choice of adding a sun to one side of the cup and a cloud to the other or they could just pick one depending on whether they thought Phil would predict 6 more weeks of winter (sun) or an early spring (cloud). Pushing the straw up and down allows the groundhog to hide in or pop out of his burrow.


Additional Resources

Fill-in-the-blank groundhog rhyme worksheet:
http://www.teachingheart.net/groundhogearsearhyme.pdf

Groundhog Day word search, crosswords, and other printables:
http://homeschooling.about.com/od/holidays/ss/groundhogprint.htm

Super cool Groundhog Day crafts:
http://www.kiboomu.com/category/featured-activity-boxes/groundhog-day-crafts-printables/

More resources for teachers: http://www.groundhog.org/teachers/elementary/

Want to find out if Phil sees his shadow this year? Check out this link on February 2.

Update: Groundhog Day 2012...Phil saw his shadow. Fooey! That means 6 more weeks of winter.

Monday, January 23, 2012

Happy Chinese New Year

Today marks the start of the Chinese New Year 2012. This is the year of the dragon. In celebration, we will be making Chinese dragons.


The template for the dragon head can be found here. Just print the dragon head on white card stock, and let the kids color and cut it out. Markers or crayons work really well. If you can find a book on the Chinese New Year or dragon dance, the kids will enjoy seeing pictures and deciding what color they want their dragon to be.


After the kids have finished coloring and cutting out their dragon head, tape a large craft stick to the back. Then add glitter. You can also embellish with crepe paper streamers. Various options for the eyes include:
  • marker or crayon
  • googly eyes
  • cut out the eyes to make a mask
  • glitter

To round out your Chinese New Year festivities, do the dragon dance, have a dragon parade, eat fortune or almond cookies, drink Chinese tea, listen to Chinese music, read a book, or teach the kids their Chinese zodiac animal signs.

Chinese lantern craft (Kaboose): Card stock works really well for this craft especially if you have colored card stock. If not, use construction paper.

Dragon dance music (found on Amazon): I like this one because it can be used as background music for your parade or you can get out the rhythm sticks and let the kids tap out the rhythm.

Chinese New Year books:
Celebrating Chinese New Year - Diane Hoyt-Goldsmith
Lion Dancer: Ernie Wan's Chinese New Year - Kate Waters
A New Year's Reunion - Yu Li-Qiong

Sunday, January 22, 2012

Orange Spice Simmering Potpourri

Baby, it's cold outside! Now's the perfect time to use up the dried orange rinds I've saved. Here's the simplest of simmering potpourris to make your house smell good and put some moisture in the air.

First, save some citrus rinds from tangerines, oranges, or clementines ("cuties"). I like "cuties" because the skin is thin and dries very quickly. You can leave the peels out to dry or put them in a warm oven after you've cooked something else and turned the oven off. They will dry pretty quickly. Just don't forget them in the oven when you turn it on to cook something else. You'll end up with smelly burnt peels! Here are some peels I have dried and then broken into good sized pieces.


Simmering potpourri makes a wonderful homemade holiday gift for friends and family. If you've got an extra canning jar, fill it with dried citrus peels. Add several cinnamon sticks and a handful of whole cloves. Then top with a pretty ribbon and a card with simmering directions. Easy peasy...homemade and inexpensive!


I bought the cinnamon sticks and whole cloves at my local co-op store. If you don't have a store with bulk spices try buying the spices in the Mexican spice aisle of your local supermarket. They usually have the best prices there.

To simmer the potpourri place a few dried orange rinds, one or two cinnamon sticks, and several cloves (5-6) in a small pot of water. Put the heat on low and let it simmer. 


The fruit and spices will plump up, the water will yellow a little, and a wonderful scent will permeate the air. You may need to add water if you simmer for a long time. Keep an eye on the pot. Never leave a simmering pot unattended!


Here in Portland, we compost our food scraps so when I am done with my potpourri, I compost it! Whether you compost or not, this potpourri is a great way to use up your leftover orange rinds.

Getting the kids involved

Let the kids join in the fun! They can eat the cuties, save their peels, and watch them dry (give it a couple of days at least). Once the peels are completely dry, they can easily help make gifts of potpourri for family, friends, and teachers. If you don't have glass jars to hold the potpourri, try using Chinese take-out boxes. The boxes are inexpensive, unbreakable, have handles, and the kids can decorate them with markers, stickers, or paint.

Friday, December 30, 2011

Gingerbread Houses


Gingerbread houses are easy and fun to make out of graham crackers. Kids love both making and eating this craft, and it is a wonderful craft to make before Christmas break (at school) or during the Christmas holidays as a special family tradition.

The graham cracker "gingerbread" houses are easy to make and can be very inexpensive. Needed items may be found at your local dollar store. Feel free to use what you have on hand.

Ingredients for houses:
  • graham crackers
  • royal icing (recipe to follow)
  • vanilla icing for decorating
  • assorted candies
  • assorted cookies
  • colored mini marshmallows
  • sprinkles
Royal icing is like an edible "glue" for gingerbread houses! It holds the houses together much better than regular vanilla icing. If you don't want to make royal icing, the kids can put their houses together with vanilla icing (not whipped). Just be sure you have plenty of time to help with construction and expect a few cave-ins. If you want to use vanilla icing for the construction, you might have the kids put their house together first and then let it sit for a while to set up before they try to decorate it.

Royal icing recipe:
  • 4 cups (approximately 1 lb) powdered sugar
  • 3 T. Wilton meringue powder (check the cake decorating section of your local Jo-Ann or Walmart store)
  • 6 T. water
  • 1 t. vanilla extract (optional)
Mix the powdered sugar and meringue together first in your bowl. Then slowly add the vanilla extract and water a little at a time as you continue beating. You really can't overbeat royal icing. Keep going for a minimum of 7 to 8 minutes. If everything globs together in your bowl and your beaters are having a hard time, add a tiny bit of water as needed. When the icing is done, it's easiest to use if you put it directly into sturdy plastic baggies. You can then zip the bags of icing closed and leave them at room temperature for a day or two (do not refrigerate). Simply snip a small hole in the bottom corner of the bag when you are ready to use the icing.

This year I made 22 houses ahead of time with royal icing. I made them 2 days ahead of time, and they were fine. You could make them a day ahead or even the same day. The royal icing dries very quickly. I made them ahead of time because my group contained a lot of young children (K-2nd grade mostly), and we had a time constraint. Having the houses ready to go allowed the children to slather on vanilla icing to their hearts content and have great fun decorating with assorted candies, cookies, and marshmallows without the worry of the houses falling apart.

Assembling the houses:
You will need 6 graham cracker sheets for each house. Four of the sheets will have approximately 1/4 of the sheet cut off on one end. The other 2 sheets will have the top edges cut at an angle to form a peaked roof (as shown).


You will use the 2 peaked sheets and 2 of the 3/4 sized sheets for the 4 walls of the house. The remaining 2 sheets will be used for the roof.

Here is an example of an assembled house. Unfortunately, I couldn't get a picture before my ruffians descended and started decorating! I used a generous amount of royal icing piped along all of the edges to hold the house together and even added some to the bottom to attach it to the plate.


Tips:
Use a serrated knife (I used a butter knife; a plastic knife will work just fine too) and "saw" back and forth gently to cut the graham crackers. Broken pieces can always be used to make fences or chimneys. More ideas include:
  • Use candies or sprinkles to create pathways in the snow
  • Snow can be made with icing or powdered sugar
  • Make snowmen out of mini marshmallows
  • Make fences out of mini twist pretzels
  • Sugar wafer cookies make great doors
  • Vanilla wafers look great on the roof as shingles
If you have time for a story, continue the gingerbread theme with one of the following books.
  • Gingerbread Baby - Jan Brett
  • Gingerbread Friends - Jan Brett
  • Gingerbread Man - Jim Aylesworth